Transcribe and summarize your meetings
-
Transform Audio to Text with AI and save hours of work
-
Identify speakers with automatic speaker recognition
-
Gain instant insights with AI-driven summarization and actionable items
Step 1
Upload your audio or video file
Step 2
Our AI processes your file
Step 3
Get your transcript and summary
All transcripts include:
-
Done in 5 minutes or less
-
30x cheaper than human transcribers
-
Accurate speaker recognition
Why choose Audiogest:
-
No subscription necessary - pay for what you need
-
Support for 99+ languages
-
Unlimited AI-driven notes
How to save time with automated transcription and summarization
Save time and money by using Audiogest to automate your transcription and summarization.
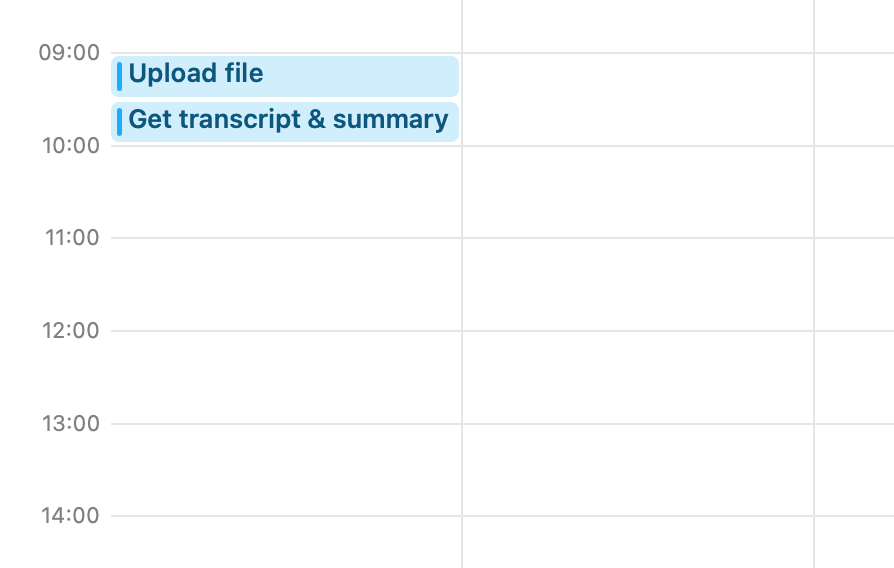
With audiogest
-
1. Upload your audio and video files
All audio and video files types are supported.
-
2. Let AI process your files
Our AI will process your files and generate a transcript and summary.
-
3. Receive your transcript and summary
Easy peasy! Export your transcript and summary in a variety of formats
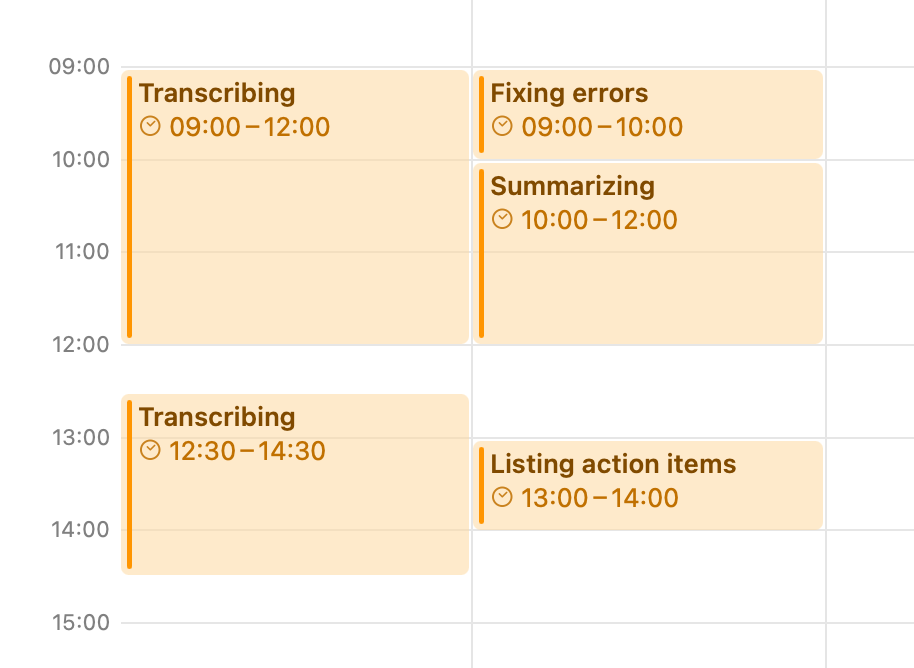
Manually transcribing and summarizing
-
5 hours of manually transcribing a 1 hour conversation
-
1 hour of fixing typos and errors
-
2 hours summarizing a transcript
-
1 hour of finding action items
-
= 10 hours of wasted time
Simple pricing
Pay for what you need or subscribe to a plan to get up to 75% off
€0 Per month
excl. VAT€4 Per hour of transcript
Get started today€60 excl. VAT
15 hSelect the hours you need
- No monthly fees
- Add more credits anytime
- Generate AI-driven notes
- Support for 99+ languages
€29 Per month
excl. VATGet 20 hours of transcripts credits every month
Choose Plus- Recurring credits at a better rate
- Early access to new features
- Generate AI-driven notes
- Support for 99+ languages
€49 Per month
excl. VATGet 50 hours of transcripts credits every month
Choose Pro- Recurring credits at a better rate
- Early access to new features
- Generate AI-driven notes
- Support for 99+ languages
Most users start with the pay-as-you-go plan. You can always switch to a subscription plan later.
Secure checkout with 


'%3e%3csvg%20xmlns='http://www.w3.org/2000/svg'%20fill='none'%20viewBox='0%200%2093%2080'%20width='31'%20height='18'%3e%3cpath%20fill='%23C06'%20d='M25.129%2013.064V71.33h25.366c23.042%200%2033.033-13.02%2033.033-31.39%200-17.595-9.99-31.27-33.033-31.27H29.522a4.393%204.393%200%200%200-4.393%204.394Z'%3e%3c/path%3e%3cpath%20fill='%23000'%20d='M6.59%202.196A4.398%204.398%200%200%200%202.196%206.59v66.82a4.398%204.398%200%200%200%204.394%204.394h40.992c27.397%200%2042.487-13.458%2042.487-37.894%200-32.815-26.62-37.714-42.487-37.714H6.59ZM47.582%2080H6.59A6.597%206.597%200%200%201%200%2073.41V6.59A6.597%206.597%200%200%201%206.59%200h40.992C86.46%200%2092.265%2025.004%2092.265%2039.91%2092.265%2065.763%2076.397%2080%2047.582%2080Z'%3e%3c/path%3e%3cpath%20fill='%23fff'%20d='M33.845%2043.42c.441%200%20.87-.072%201.287-.214.416-.143.786-.38%201.11-.712.326-.33.586-.763.78-1.296.195-.532.293-1.183.293-1.95%200-.702-.069-1.335-.204-1.9a3.782%203.782%200%200%200-.673-1.453%202.999%202.999%200%200%200-1.237-.926c-.515-.215-1.148-.322-1.901-.322h-2.184v8.774h2.73Zm.215-11.346c.896%200%201.732.144%202.504.43a5.438%205.438%200%200%201%202.008%201.285c.566.572%201.007%201.287%201.327%202.145.317.858.477%201.865.477%203.022%200%201.014-.13%201.95-.39%202.808-.26.856-.653%201.598-1.179%202.221a5.52%205.52%200%200%201-1.97%201.473c-.786.358-1.712.536-2.777.536h-6.005v-13.92h6.005Zm18.756.001v2.572h-7.349v2.983h6.744v2.379h-6.744v3.412h7.505v2.573H42.406v-13.92h10.41Zm10.656%208.538-1.755-5.108h-.039l-1.812%205.108h3.606Zm-.175-8.539%205.204%2013.92h-3.177l-1.053-3.1h-5.206l-1.091%203.1h-3.08l5.264-13.92h3.139Zm10.19.001V43.42h6.784v2.573h-9.845v-13.92h3.06Z'%3e%3c/path%3e%3cpath%20fill='%23000'%20d='M20.088%2039.034a6.421%206.421%200%201%201-12.842%200%206.421%206.421%200%200%201%2012.842%200ZM18.53%2071.33c-5.373%200-9.73-4.356-9.73-9.73v-7.588a4.865%204.865%200%200%201%209.73%200V71.33Z'%3e%3c/path%3e%3c/svg%3e%3c/g%3e%3c/svg%3e)
'%3e%3csvg%20viewBox='0%200%20512%20210'%20width='31'%20height='18'%3e%3cpath%20d='M93.6,27.1C87.6,34.2,78,39.8,68.4,39c-1.2-9.6,3.5-19.8,9-26.1c6-7.3,16.5-12.5,25-12.9%20C103.4,10,99.5,19.8,93.6,27.1%20M102.3,40.9c-13.9-0.8-25.8,7.9-32.4,7.9c-6.7,0-16.8-7.5-27.8-7.3c-14.3,0.2-27.6,8.3-34.9,21.2%20c-15,25.8-3.9,64,10.6,85c7.1,10.4,15.6,21.8,26.8,21.4c10.6-0.4,14.8-6.9,27.6-6.9c12.9,0,16.6,6.9,27.8,6.7%20c11.6-0.2,18.9-10.4,26-20.8c8.1-11.8,11.4-23.3,11.6-23.9c-0.2-0.2-22.4-8.7-22.6-34.3c-0.2-21.4,17.5-31.6,18.3-32.2%20C123.3,42.9,107.7,41.3,102.3,40.9%20M182.6,11.9v155.9h24.2v-53.3h33.5c30.6,0,52.1-21,52.1-51.4c0-30.4-21.1-51.2-51.3-51.2H182.6z%20M206.8,32.3h27.9c21,0,33,11.2,33,30.9c0,19.7-12,31-33.1,31h-27.8V32.3z%20M336.6,169c15.2,0,29.3-7.7,35.7-19.9h0.5v18.7h22.4V90.2%20c0-22.5-18-37-45.7-37c-25.7,0-44.7,14.7-45.4,34.9h21.8c1.8-9.6,10.7-15.9,22.9-15.9c14.8,0,23.1,6.9,23.1,19.6v8.6l-30.2,1.8%20c-28.1,1.7-43.3,13.2-43.3,33.2C298.4,155.6,314.1,169,336.6,169z%20M343.1,150.5c-12.9,0-21.1-6.2-21.1-15.7c0-9.8,7.9-15.5,23-16.4%20l26.9-1.7v8.8C371.9,140.1,359.5,150.5,343.1,150.5z%20M425.1,210.2c23.6,0,34.7-9,44.4-36.3L512,54.7h-24.6l-28.5,92.1h-0.5%20l-28.5-92.1h-25.3l41,113.5l-2.2,6.9c-3.7,11.7-9.7,16.2-20.4,16.2c-1.9,0-5.6-0.2-7.1-0.4v18.7C417.3,210,423.3,210.2,425.1,210.2z'%20fill='black'/%3e%3c/svg%3e%3c/g%3e%3c/svg%3e)
'%3e%3csvg%20viewBox='0%200%2080%2038.1'%20width='31'%20height='18'%3e%3cstyle%20type='text/css'%3e%20.st0{fill:%235F6368;}%20.st1{fill:%234285F4;}%20.st2{fill:%2334A853;}%20.st3{fill:%23FBBC04;}%20.st4{fill:%23EA4335;}%20%3c/style%3e%3cpath%20class='st0'%20d='M37.8,19.7V29h-3V6h7.8c1.9,0,3.7,0.7,5.1,2c1.4,1.2,2.1,3,2.1,4.9c0,1.9-0.7,3.6-2.1,4.9c-1.4,1.3-3.1,2-5.1,2%20L37.8,19.7L37.8,19.7z%20M37.8,8.8v8h5c1.1,0,2.2-0.4,2.9-1.2c1.6-1.5,1.6-4,0.1-5.5c0,0-0.1-0.1-0.1-0.1c-0.8-0.8-1.8-1.3-2.9-1.2%20L37.8,8.8L37.8,8.8z'/%3e%3cpath%20class='st0'%20d='M56.7,12.8c2.2,0,3.9,0.6,5.2,1.8s1.9,2.8,1.9,4.8V29H61v-2.2h-0.1c-1.2,1.8-2.9,2.7-4.9,2.7%20c-1.7,0-3.2-0.5-4.4-1.5c-1.1-1-1.8-2.4-1.8-3.9c0-1.6,0.6-2.9,1.8-3.9c1.2-1,2.9-1.4,4.9-1.4c1.8,0,3.2,0.3,4.3,1v-0.7%20c0-1-0.4-2-1.2-2.6c-0.8-0.7-1.8-1.1-2.9-1.1c-1.7,0-3,0.7-3.9,2.1l-2.6-1.6C51.8,13.8,53.9,12.8,56.7,12.8z%20M52.9,24.2%20c0,0.8,0.4,1.5,1,1.9c0.7,0.5,1.5,0.8,2.3,0.8c1.2,0,2.4-0.5,3.3-1.4c1-0.9,1.5-2,1.5-3.2c-0.9-0.7-2.2-1.1-3.9-1.1%20c-1.2,0-2.2,0.3-3,0.9C53.3,22.6,52.9,23.3,52.9,24.2z'/%3e%3cpath%20class='st0'%20d='M80,13.3l-9.9,22.7h-3l3.7-7.9l-6.5-14.7h3.2l4.7,11.3h0.1l4.6-11.3H80z'/%3e%3cpath%20class='st1'%20d='M25.9,17.7c0-0.9-0.1-1.8-0.2-2.7H13.2v5.1h7.1c-0.3,1.6-1.2,3.1-2.6,4v3.3H22C24.5,25.1,25.9,21.7,25.9,17.7z'%20/%3e%3cpath%20class='st2'%20d='M13.2,30.6c3.6,0,6.6-1.2,8.8-3.2l-4.3-3.3c-1.2,0.8-2.7,1.3-4.5,1.3c-3.4,0-6.4-2.3-7.4-5.5H1.4v3.4%20C3.7,27.8,8.2,30.6,13.2,30.6z'/%3e%3cpath%20class='st3'%20d='M5.8,19.9c-0.6-1.6-0.6-3.4,0-5.1v-3.4H1.4c-1.9,3.7-1.9,8.1,0,11.9L5.8,19.9z'/%3e%3cpath%20class='st4'%20d='M13.2,9.4c1.9,0,3.7,0.7,5.1,2l0,0l3.8-3.8c-2.4-2.2-5.6-3.5-8.8-3.4c-5,0-9.6,2.8-11.8,7.3l4.4,3.4%20C6.8,11.7,9.8,9.4,13.2,9.4z'/%3e%3c/svg%3e%3c/g%3e%3c/svg%3e)
Privacy & Security first
We are EU based, so your data is safe with us
Your data is safe in EU based data centers
All your data is processed and stored in EU based data centers and servers. Including your audio files, transcripts and notes.
Your data is never used for training AI models
We never use your data to train or fine-tune AI models. Your data remains private and exclusively yours.
You own your data
Generated content like transcripts and summaries are yours to use, share, and distribute as you see fit.
Frequently Asked Questions
Answers to common questions about Audiogest
- How does the AI transcriber and summarizer work?
- The transcriber and summarizer work in a few simple steps: upload your file, select the type of summary you like. Then wait for the processing to finish to receive your transcript and summary.
- Is Audiogest GDPR compliant?
- Audiogest.app follows GDPR principles. Your uploaded audio and video files and all other data are processed securely in EU based datacenters and are only used to generate transcripts and summaries as requested. Read more about data privacy in our privacy policy and help center.
- What is the maximum file size supported?
- The maximum file size is 1GB with a maximum length of 5 hours (300 minutes). This can be any video or audio file. If you want to process larger files or longer, please contact us at [email protected].
- What languages are supported for transcriptions?
- Audiogest supports 99+ languages, including English, Dutch, German, French, Spanish, Italian, Polish and many more.
- What file types are supported?
- All audio and video file types are supported, including the types aac, ogg, m4a, mp3, mp4, mpeg, mpga, wav, webm and more. This includes recordings files from Zoom, Google Meet, Microsoft Teams, iPhone Voice Memos, etc.
- Is my data used to train AI models?
- No, your data is never used to train or fine-tune machine learning or AI models.
- How is my data stored?
- Uploaded recording files are converted to audio files and are stored on our servers that are hosted in the EU (Frankfurt, Germany). All other data, including user data is stored on servers located in Amsterdam, the Netherlands. Your data can be deleted by deleting your file in the app. Check our privacy policy and terms and conditions for more information.
- Do you offer a student discount?
- Yes, 35% off for all credit purchases! Just sign up with your student or academic email address and the discount will be automatically applied. Don't see the discount? Send us an email from a .edu or student email address to get the discount code.
- Do unused credits carry over to the next month when I have a subscription?
- Unused transcription credits do not carry over when you have a subscription. Your transcription credit is reset every month. Pay-as-you-go do carry over, as they never expire.
- Can ChatGTP generate transcripts?
- Yes, ChatGPT can generate very basic transcripts. But these transcripts do not have speaker labels and can be less accurate.
- Can I use ChatGPT to summarize my transcripts?
- Yes you can use ChatGPT to summarize your transcripts you get from Audiogest. You can easily copy and paste your transcript in ChatGPT with the "copy as markdown" button. Use custom AI Prompts in Audiogest to generate AI documents faster and more consistent.
What our customers say
See what our customers say about us
Get started with Audiogest
Get accurate transcripts and summaries of your audios and videos
Save hours of work and money